Thursday, September 27, 2012

Expression Gourds


I took inspiration from the funny faces on the pumpkins in this art lesson from Deep Space Sparkle. I wanted a lesson that was Autumnal and helped my students to better understand the concept of facial expression in art work. 

On Day 1 of the project we talked about gourds and I brought a bunch of real gourds in to examine with our eyes, noses, and fingers. We made some funky paste paper with some bright Fall colors hand-mixed with cornstarch to give the paint texture. We used some recycled cut plastic hand tools to make repetitive line patterns in the wet paint.

On Day 2, I put some trays with scraps of black and white paper on each table and jumped right into deconstructing the idea of facial expression. When I teach expression, I focus only on mouth and eyebrow placement. I made this poster which displays my good friend Rex with detachable eyebrow and mouth shapes. I use Rex to demonstrate how the direction our eyebrows are drawn sends a very specific emotive impression. I have students come up and take turns matching his facial features to a feeling.
The Rex-pression chart showing angry, surprised, thoughtful, and frustrated.
I totally love how thoughtful these expressions turned out. Way to go 2nd Grade!


Sunday, September 23, 2012

Fall Open House

This past Wednesday, we had our Fall Open House evening at my school. I had the pleasure of meeting moms, dads, uncles, aunts, grandmas, grandpas, brothers, sisters, and even friends of the students I work with each day. Though open house night makes for a seriously long 13 hour school day, it is so worth it to have a chance, however brief, to interface with families. I love passing on art room triumphs and notable character traits about each girl and boy. I remember how when I was a little girl I absolutely hung on every word my teachers had to say about me and recorded their exact words in my diary! My teachers had a really special way of building me up so I could feel/be successful.

I learned the hard way my first year as a long term substitute teacher that I simply can not handle getting out each piece of art work-- for each project --for each student. That year, I got out work at each students' request and by the end of the night when the room was finally quiet and everyone went home, I was left in a room that was a jumbled mess with art work from different classes all mixed together. Luckily, some thoughtful janitors came in and helped me reorganize. I think I remember driving home that night around 11:30 pm. Unfortunately, working with nearly 700 students makes this kind of intimate dialogue about individual pieces of artwork impossible. I did make sure every student had a piece up in the main lobby from our first masterpiece project and tried to get a group display together by each grade level in the school hallway.

In addition to touching base with loved ones, it was important for me to communicate to parents exactly what we we do in the art room. In an act of true fate, I was visiting Art Project Girl's blog and found her 1,2,3 Easy Open House Ideas post. I saw that she made a brochure for parents to take home so they could see how art class was supporting not only their artistic needs, but also their social and emotional development. I was inspired! I created my own art brochure using a simple template in Microsoft Word. Like Art Project Girl, I included my bio, my art room rules, auxiliary skills I focus on in my curriculum. I added a brief plug for my blog and a short list of materials we use. One mom who visited the art room with her daughter told me that she has visited C vs. S and is glad I am at her daughter's school. I can not tell you how good that small act of kindness made me feel.


Saturday, September 22, 2012

Double-loaded Sunflower Still Lifes

Oh, how I love you, 1st Grade van Gogh inspired sunflower paintings! Let me take a moment to count the ways...


1) Right on time. Sunflowers are at their natural growth peak in late summer right when school starts. Since I live in a rural area and thanks to my fabulous colleague, Mrs. Herr, I was able to get my hands on some real live sunflowers for the students to look at, sniff, and touch. I even got out a few pairs of plastic science tweezers so we could do some intricate sunflower seed surgery, extracting the seeds from the seed head so the students would understand how the seeds are arranged in the sunflower. I explained that when the sunflower is done blooming, the seeds fall to the ground until next spring, when they'll grow into new sunflower plants. Did you know a sunflower can grow up to 12 feet tall?

2) Line Variety Review We spent the entire first day of class learning about van Gogh's life, basic sunflower anatomy, and using our observational skills to sketch the flowers we saw in front of us. These are the directions I gave to my 1st graders to help them capture the scene. This sketching method reinforces most of the lines they were introduced to last year in Kindergarten.


3) Double loaded brushes!!! For most projects we do with paint, I am a real stickler for using only one color at a time and constant brush hairdo rinses. For this project, the students were allowed to, gasp, double load their brush with two colors at a time! I gave the students some yellow, orange, and white so they could experiment using thick, double loaded brush strokes much like van Gogh. This gave them beautiful two toned petals which literally inspired a round of applause during my demonstration! The little people have spoken and it is unanimous, double loaded paint brushed are awesome.


This work is a result of a mash-up of a lesson I spied here on the Sunrise Point Elementary website, but it is very similar to this post over at Deep Space Sparkle.

Tuesday, September 11, 2012

Halloween Costume? Check!


I know it's not even mid September, but I promised myself I would come home directly after school and finalize the plans for my Halloween costume. Last year, during my first year of teaching at my school, I made the huge faux pas of not being adequately prepared for the festivities. What I didn't know is there is a highly competitive teacher costume tradition. My colleagues "bring it" when it comes to Halloween. The entire school, grades K-6 and staff participate in a costume parade that goes all the way around the outside of the school that the entire community comes to see. This year I vowed I would make amends and do something big!

I came home and whipped up this design inspired by "The Persistence of Memory" by Salvador Dali.


I found this great picture of a dainty, yet boldly surreal hat here for sale in an adorable UK Etsy shop called Soobird. I think this is breathtakingly awesome but unfortunately, it is way out of my price-range. My plan is to borrow elements of the hat, creating the sculptural branch and melting clocks out of Model Magic or Sculpey clay.

I was able to create some "Persistence of Memory" fabric using Spoonflower, a website where you can make and purchase custom fabrics. I ordered 3 yards for the skirt of the dress and I am literally counting the days until it will arrive at my doorstep. 

This weekend I will go shopping for plastic ants (eeek!), feathers, the most surreal belt I can find, and hopefully on my travels I will find something that can serve as the large creepy eyelashes.

Fellow Art Teachers: Do you dress up for Halloween? What did you go as last year? What are your plans for this year?


Sunday, September 9, 2012

Let's Make This Year a Masterpiece


Our first project of the year took on colossal proportions! In the very first week of school, we were able to produce six large-scale, gorgeous murals. I had seen these murals available at Art Projects for Kids and thought they would be great to keep up all year to help add some classy modern art to the beige school hallways. I would probably never do this as an actual project, but I thought it was a perfect fit for a first day ice breaker and helped to get the ball rolling as we dug into some pretty juicy bits of art history.
I chose a different masterpiece for each grade level. The murals come in about 24-30 pages so I had to cut each of the pages in fourths to have enough for each student. I put the pieces in order and wrote their sequence number on the back. 

This involved many hours of puzzle piece labeling. It was sort of exhausting, but luckily my cat apprentice, Alfie, was there to lend a paw. He thought laying on my neatly arranged pieces and making them not so neatly arranged would be of great help! He did a great job.

Each student received a tiny puzzle piece of the mural and used oil pastels to color the piece in the style/color/pattern of their choice. I started referring to this project as “Masterpiece Makeover” and I advised the students if each of them focused on making their individual piece a masterpiece on its own, then we could potentially multiple the awesomeness of the original masterpiece by 120! This seemed to get them pretty revved up.

We talked about how the definition of a masterpiece is different for different people. If students were done early, I asked them to write their personal definition of what makes a masterpiece on a piece of white paper. I got some very interesting results including:


  • "A masterpiece is a picture by anyone who tried their hardest." --4th Grade Artist
  • "A masterpiece to me is hard work." -- 5th Grade Artist
  • "A masterpiece is a colorful, magical, great piece of art." --3rd Grade Artist
  • "A masterpiece is a piece of artwork that makes the artist feel proud." -- 5th Grade Artist
  • "A masterpiece is a piece artwork that belongs in a museum." --4th Grade Artist
  • "A masterpiece is a time valued piece of art that is irreplaceable. --5th Grade Artist

The “Masterpiece Makeover” was a bit too much for my youngest learners, the Kindergarteners. Their first day consisted of a train tour around the art room to get them acquainted with the layout and parts of the room and proper procedures. I kept things very simple for them by asking them to use the crayons to draw me a mini masterpiece of their very favorite thing to draw. This helped me to get to know their individual personalities a bit. We rounded out the class with a tidbit of glue practice with the help of this “Ode to Proper Glue Usage” poem I found on Pinterest.

Saturday, September 8, 2012

Va Va Voom in the Art Room


Just wrapped up the second week of school in the C vs. S classroom. I must say heading into my second year of teaching feels a ton more comfy than starting out brand spankin' new last year. I began the year on a total organization spree, vowing to do something about a few problem areas I noticed last year but did not have the time to address.

Challenge #1 : The Haunted Paper Closet
I am embarrassed to say that I spent the entire last year with a paper closet that was...less than functional. Last year, I avoided this closet all together. I walked all the way down the hall to the storage closet when I needed fresh paper, which was not a working solution as it put me in a real pinch if I ran out of a certain kind of paper and I had kiddos in the room.


Ahhhh! Look at this guy. It looks like a monster with a dozen tongues. Shame, shame, shame on me. Between this and the spooky kiln, I am surprised any child has ever had enough guts to step foot into the art room!
It took me just a few short hours after school on an in-service day to tame this beast. Now the storage space looks so neat and inviting I could practice my yoga moves in front of it! I was able to save nearly all of the paper. I will use the cut pieces I found for various collage or cut paper projects for the upcoming year. The really old, bleached out stuff (which I carbon dated back to sometime around 1964, tee hee hee!) I can use as painting/printmaking place mats.
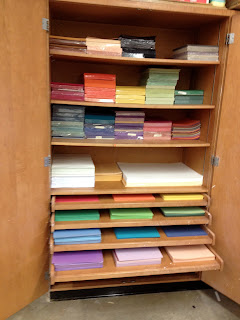
Oooooooh! Ahhhhh! The new, and improved paper storage closet!

Challenge #2: Sink Climbers
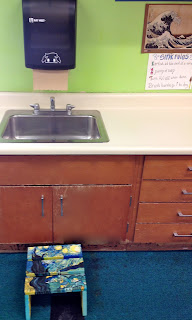
Some of the littlest artists that visit the art room find that some of the tools are too large to help them be in charge. My sink is one of those tools. On several occasions last year during clean-up and hand washing, I would see the little beans hoisting themselves up on their bellies performing a strange kind of Cirque de Soleil balancing act on the sink counter to reach the water handles or the soap dispenser. While this move was quite resourceful and oftentimes comic, it caused my heart to palpitate in unwelcome ways. I tried to help them to reach the things they could not, but some of them are just so itty bitty that they could still not get their hands to reach the water. Solution: I invested in a simple Kindergartener-friendly sized stepping stool and painted it in Van Gogh's "The Starry Night." Already this year, I have seen little ones taking the stool down off the hook quite matter-of-factly, using it to reach the sink, and putting it away. Adorbs!


Challenge #3: Storage Box Clutter
One of the great design aspects of my art room is that is surrounded by cabinets. We have the floor to ceiling cabinets, rolling cabinets, cabinets in our work tables, basically an art teacher's dream. Still, with all of the cabinets my room has there is still not enough concealed space to store larger art room supplies, recycled materials, the "extras" (paper towel rolls, coffee cans, cereal boxes) that all truly resourceful art teachers collect. The tops of my cabinets were lined with mismatched cardboard boxes that contain many exciting supplies, but none the less, look a bit junky. In an attempt to hold on to the great things these boxes are holding, but to also make the art room space look more inviting/visually stimulating I created some melted wax "garage doors" using some large cardboard scraps, gesso, and old crayons. Anyone who is an art teacher and has access to Pinterest has seen this melted crayon drip idea and I love it. It is such a good use for all of those old, but beautifully colored crayons that the kids are less than excited to use anymore. The panels are hung from the ceiling using clear fishing line. When I need access to the supplies behind them I just lift up one of the garage doors and "Voila!" The kids are mesmerized by the panels and have been asking if we could do a project that incorporates crayon drips. Has anyone figured out a school friendly way of executing this process in their classroom?

Challenge #4: Volume, volume, volume!!
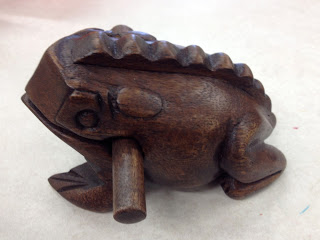
I picked up this little guy at the Aloha Stadium Swap Meet this summer during my travels to Hawaii this past summer! The music teacher at my school informs me this instrument is called a güiro (with a rolled r!) Taking inspiration from my time teaching at a Montessori School, I brought this little guy into the classroom as a tool that the students could use to moderate their own volume. If any student ever feels the room is getting too noisy to concentrate, the student may get up and grab the güiro and play it three times. The güiro makes a kind of chirping sound when the wand is dragged across the divots carved along the frog's back. When the class hears this sound, it is their job to reduce the volume of their conversation. This method worked wonders in the Montessori classroom, I will get back to you on how well my current group does using this tool. When I introduced the instrument, I explained it was a tool for them to use, not me. We also talked about the fable The Boy Who Cried Wolf so they would understand that if the güiro is overused, it will lose its meaning. One of my savviest 5th graders said, "Wait, you're on vacation in Hawaii and you're thinking about the volume of the art room?" His question made me giggle and I picked up on his meaning. I assured him that no matter where I am, I am always thinking of the art room.

Challenge # 5: Vocabulary Acquisition
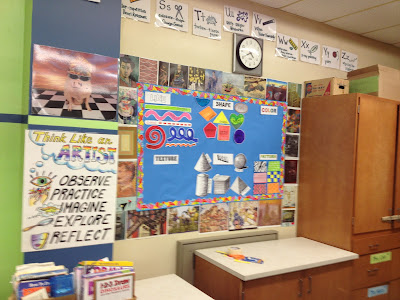
A colossal criticism I have of last year's art room is that I didn't have enough examples of the elements,principles, and art vocabulary art in my room. This year I created an art vocabulary board to reinforce a lot of the vocabulary I touch on a lot during my lessons. I am most excited about the "touchable texture" section in the lower left corner. I also hung up my Art Alphabet, the design of which I picked up from a fabulous art teacher that a did a long-term sub for. Thanks again, Mrs. Sadowski!


I will leave you will a vision of what the kids saw when they first came to art class this year....
The first thing they may have noticed is my huge pencil sculpture. I repurposed it as an arrow pointing the way to the art room.
Our inspirational art theme this year: "Creativity Blooms Inside the Art Room!"
And some 3-D ants, bees, and beetles for good measure!