[slideshow]
A few weeks ago my second graders and I began a journey into the atomized world of French Pointillist paintings by George Seurat. What I didn't anticipate is that our journey bravely blazed a new trail that involved writing and performing an original song together! Yes, ladies and gentleman, the talented 2nd graders I get to see on a daily basis composed an original song all about George Seurat.
It all started a few years back when I was completing a long-term sub for an amazing art teacher on maternity leave. One of the lessons she left for me to complete was titled Dot, Dot, Seurat! Since then, I have seen similar lessons labeled with the same title, I suppose because it is such an easy way to help students remember through rhyme that the paintings of George Seurat can be identified by the use of lots of dots.
I taught this lesson at three different schools so far, and this was the first time the rhyme really took the class to a new, totally new musical place. One of the students was repeating the title of the lesson on the board while he worked on his painting, "Dot, Dot George, Seurat! and then he added "likes to paint in dots a lot!" From there, the rhyming spread like wildfire. I was so tickled by the students' interest and impressed by the students rhyme ideas I started jotting their lines down on the board. I shared this story with my other three 2nd grade classes and they helped to add on to the song as well.
On the last day of the Seurat lesson, I had the lyrics the students produced typed out neatly and we performed and recorded our song on my iPhone. I added a drum track and a piano lick using a few handy-dandy iPhone apps. The final cut of our musical track is hosted on Vimeo and posted below. Do you think George Seurat would dig this song? I do. It was so pleasant to be blown away by the serendipitous creativity of a second grader's response to a new artist. I am also infinitely tickled to have technology that helped me to propel this student's bright idea to another level.
http://vimeo.com/37468634

Saturday, February 25, 2012
Sunday, February 19, 2012
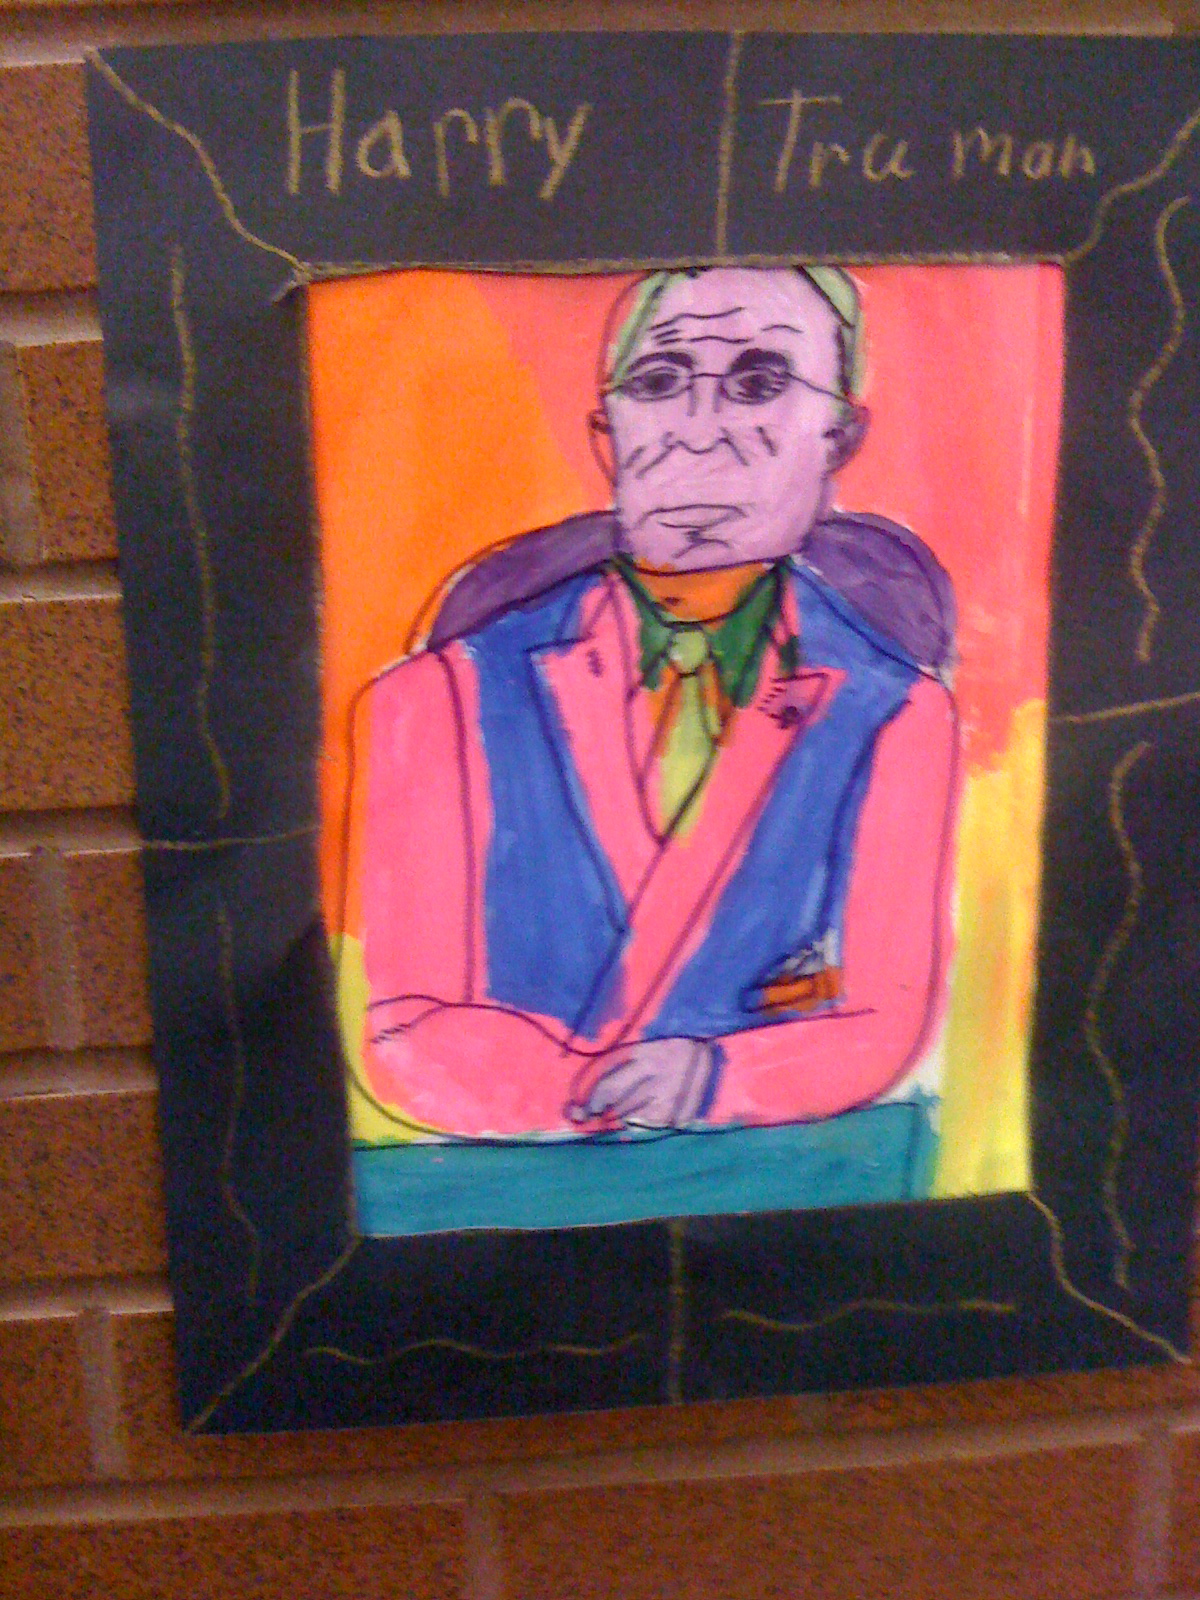
Funky Presidential Portraits
Tomorrow morning when students enter the school they will be welcomed by a new display of Presidential Portraits greeting them. I'm hoping this will add a spark to a Monday that most school's have off for vacation. I found the lesson plan for this project in the January 2012 edition of Arts & Activities. There is a link to the article here that explains the basic material layering process that helps to achieve the end result. The art teacher responsible for this lesson is Cheryl Crumpecker is a K-3 art teacher at St. Paul's Episcopal Day School in Kansas City, Mo. She used this lesson to compare the traditional portrait style of Gilbert Stuart and pop artist, Peter Max, but I decided to just focus on Max's unique painting style, drawing on the right side of the brain, line quality, and color mixing. I used heavyweight card stock for the drawing/painting and found some acetate transparencies to use for the Sharpie line drawings. I was hesitant about following the portion of Cheryl's directions that asked the students to draw their president UPSIDE DOWN. I decided to take a risk and believe in the extraordinary abilities of my 5th graders and ended up being beyond pleasantly surprised.
On the second day of the lesson before we began painting, I showed students a brief video of a recent story the CBS Morning Show did on Peter Max and his patriotic style. I used this video. It was a good way to show students how popular and iconic Max's work is. He has painted on a lot of important things such as jumbo jet airliners and even the White House lawn during the Reagan era. It also gives students a glimpse of how Max uses his paint, painting quickly, mixing a bunch of bright colors on one brush (usually an art room no no!), and painting a background of block colors.
I took a lot of pictures because I was so excited about the results so I will inserting them all as a slideshow.


Sunday, February 12, 2012
Daruma Dolls

Before I landed my fabulous new job as an art teacher of some of the most amazing human beings in Pennsylvania, I was working as the Arts & Education Director with Young Audiences of Western New York. I learned about Daruma dolls from one of the extraordinary teaching artists I worked with at this job, Jen Russo. Jen was making Daruma sculptures with at an after-school program for one of the residency programs I coordinated. I had never heard of a Daruma Doll before and as soon as Jen explained the concept behind the doll to me I was instantly intrigued and inspired. In addition to Jen's guidance, I found a few other super online resources to learn more about Darumas such as this informative Daruma PDF put out by the Allen Memorial Art Museum with Oberlin University.
In short, a Daruma is a Japanese sphere-shaped papier mache doll with a red painted body and a white face without pupils! Daruma dolls represent Bodhidharma, a Zen monk who meditated for almost 9 years while sitting in a meditative posture for so long that his legs were of no use anymore. We compared and contrasted the way we celebrate the New Year with the Japanese tradition of the Daruma doll. The students drew some very interesting parallels!
Throughout the year, but traditionally on New Year's Day, one makes a wish or sets a goal and paints one black pupil onto the Daruma doll. When the goal is reached or the wish comes true one then paints on the second pupil and dispose the doll on the following New Year's Day.
The project began with a full day of Plaster of Paris which the students loved working with. Luckily, the art teacher who was at my school before me bought several boxes of the Plaster of Paris rolls. I prepped for this sculptural building day by cutting the plaster into 2" x 4' inch strips and by blowing up nearly 100 balloons! (My boyfriend Matt was there to help for this, thank goodness!) We used a piece of 9' x 6' manilla paper folded into a bracelet-like ring at the Daruma's base. The students taped this ring to the bottom of the balloon. I also cut tiny triangle pieces of card stock that the students taped onto the balloon for the nose.

 On the second day, we started talking about some of the symbols that are typically painted onto the Daruma's face and body. I provided students with variety of colors for the paints. I did not make them stick to the traditional red color as I thought it would be cool for the students to be expressive with color rather than formulaic. I showed the students how to mix a flesh tone to match the traditional Daruma.

 I got out the smallest paint brushes I had for the detailed thin lines on the Daruma face and the students practiced using a light, delicate brush stroke to achieve different kinds of line quality. I printed out several copies of Japanese word symbols so students could pick words that relate to their New Year's goal to use in their Daruma decoration.
When the students were finished painting their Daruma's exterior, they were allowed to use a Sharpee to write their goal for 2012 on the bottom of their Daruma and paint one of the eyes in. I really wanted to peek and see what their goals were, but I promised them that I wouldn't look because their goal may be personal.
The hallway display of the 5th grade Daruma's has created quite a stir with students and other teachers. Many passers by are curious why the Darumas only have one eye. The display is located just outside the art room and I have heard more than one 5th grader proudly explaining the Japanese tradition to students in other grade levels. I was happy to hear this!


Tuesday, December 13, 2011
Diatoms: A Study In Radial Symmetry

How do artists use nature as a basis to inspire artistic
design?
What are diatoms, where can they be found in local
ecosystems, and how are they a useful tool for both artists and ecologists?
For the past few weeks, my 5th graders and I have been on a super interesting journey into the microscopic, yet gorgeous world of diatoms. If you don't know what a diatom is, don't feel discouraged! I had no idea what a diatom was either until I discovered the amazing bio drawings of Ernst Haeckel just last year. In short, diatoms are microscopic, single-celled organisms that live in aquatic environments. Diatoms are encased in beautiful, iridescent cases that grow in elaborate bilateral and radially symmetrical shapes. Plant and animal cells are a major part of the 5th grade curriculum that the students were covering this Fall, so the choice the pair watercolor painting techniques with diatoms ended up being a smash hit!

Objectives: The
students will…
·
understand how the invention of the compound
lens microscope advanced the field of botanical drawing and allowed artists and
scientists to view the microscopic structural details of objects from nature.
·
relate 2-D design principals such as shape,
repetition, and symmetry to the naturally occurring organic forms found in
microscopic diatoms.

On the first day of our diatom unit, I placed a picture showcasing a
variety of diatoms under a microscope on each table. As the students
waited in their line outside of my door I told them they would have 2o
seconds to examine the photograph, talk with their table mates, and come
up with an idea of what they thought was depicted in the photo. The
student guesses ranged from "pillows from Pier1 Imports" to Willy Wonka
candy, to bacteria. I gave a brief overview of what diatoms are, that
they are found in aquatic environments, that they evolved in the
Jurassic Period, and that they are used in several household products
such as toothpaste! After the introduction, I explained to students that
we were going to do our best to draw very large-scale. (We used 18 X 24
inch paper) We were going to take something microscopic and enlarge its
scale by 10,000! I demonstrated how to draw the diatom by looking for
familiar shapes like triangles and circles and patterns. I emphasized
starting on the inside of the form and working out since most of the
diatoms have radial symmetry. I stressed drawing so large that the
diatom goes off part of the page. I also encouraged students to spice up
their composition by having some of the diatom forms overlap. After the
students were satisfied with their drawing they went over the lines
with black acrylic paint.


On day two of the diatom unit, I showed students how to paint using the wet on wet watercolor technique. The classes went crazy over this new skill! They loved how the paints "exploded" when they hit the page and the watery result of this technique worked well conceptually for the diatom's watery environment.
The students got very experimental with the watercolor painting. One student even recalled the splatter technique used in Japanese suminagashi paper making that we used a few projects back and begin to try this method with watercolor paints. He got some really interesting results which inspired other students to give it a try. I like to make a big deal over connections like this that the students make. I told him he was really thinking like an artist -- being innovative within the parameters to create a new result.
It took one additional 45 minute class for the students to finish their diatoms. The students were so excited about this project that they got really into coming up with names for our exhibit. In the end it was a toss-up between a lot of really cool ideas including "Jingle Cells," and "Tie-Diatoms." Ultimately, we decided to go with "Deck the Halls with Diatoms." Did I mention what an extraordinary group of 5th graders I have the pleasure of working with each day? This project was a boat-load of fun.


Saturday, November 12, 2011
Alliteration Illustrations
I picked up this lesson from my cooperating teacher when I was doing my student teaching outside of Philadelphia. Nearly four years later I finally have the perfect group of fifth graders to try this with and the results were well worth the wait! This lesson integrates ELA curriculum as it focuses directly in the literary device alliteration which the students were briefly introduced to in fourth grade. It also reinforces library concepts such as author and illustrator and allows the students a chance to take a crack at being both! I used the book "Animalia" by Graeme Base which illustrates the concept of alliterative illustrations perfectly using animals as a muse. Lesson plan, teacher examples, and students creations below. Enjoy!
Lesson Title: Alliteration Illustrations
By Sunnylee Mowery
Grade Level: 5
Subjects: Visual & Language Arts
Time Needed: 2-3 45 minute class periods
Skills addressed:
o Students understand the definition of alliteration and can identify its use
o Students can determine when and how to use alliteration in their writing
o Students understand the job of an illustrator and practice conveying detailed descriptions through imagery
Objectives
o Students will write a colorful sentence using alliteration
o Students will illustrate their alliteration in a full page composition
o Students will show a horizon line in their composition and demonstrate an understanding of space by including near and far landscape elements
Materials: Lined paper, 12X 18 drawing paper, black felt tipped markers, crayons, “Animalia” by Graeme Base
Vocabulary: alliteration, illustration, brain storming, sketch, adjective, verb, adverb
Introduction: Alliterations are sentences or phrases that contain words that repeat the same beginning consonant sounds. For example dogs, destroy, dinosaurs, etc. Writers use this craft to make their writing more interesting and fun. I will share some of the alliterations from the text “Animalia” and explain that today we will be doing the job of both author and illustrator. I will test students’ understanding of alliteration by asking them to compose a Ms. Mowery alliteration on the spot! (5 minutes)
Demonstration: I will model for the group how to compose an exciting animal inspired alliteration and artist brain storming sketch. I will emphasize the use of colorful adjectives, action verbs, adverbs, locations, and numbers to make their sentence as descriptive as possible. I will then model for the group how to compose an artist brain storming sketch that shows all of details described in their alliteration sentence.
Activity: Students will work at their tables to compose an alliteration sentence and artist brain storming sketch. Students will be allowed to talk quietly in order to bounce ideas off of each other. Students will have access to multiple animal books in order to sketch animals with accuracy.
Closure Questions: What is alliteration? What is the job of an illustrator? Why do authors use alliteration in their work? Why do artists compose brain storming sketches at the beginning of a project? What is an example of a three word alliteration? What is the line that separates sky from land?


Subscribe to:
Posts (Atom)